Installing a homelift is one of the most effective ways to improve accessibility and convenience in your home. Whether you want to make your property safer for ageing in place, assist family members with mobility challenges, or simply add a modern touch to your home, a professionally installed Uplifts homelift can transform your daily routine. From the initial consultation to the final demonstration, every step of the homelift installation process is carefully managed to ensure safety, reliability, and a seamless finish. In this guide, we’ll walk you through each stage of installation, highlight key considerations, and explain why Uplifts is a trusted choice for homeowners. Whether you are having your homelift installed in a bedroom or a living room, no matter the space we ensure the installation process is seamless.
The importance of a pre-installation survey
Every successful homelift installation begins with a detailed site survey, whether that’s for our S2 two-person homelift or our S3 wheelchair lift.
When our team arrives on-site, they conduct extensive checks to ensure that nothing is missed. The survey assesses the available space, confirms that the lift will fit seamlessly, and evaluates the structural integrity of your home to ensure it can safely support the installation.
During this phase, we also plan the optimal route for the lift’s power supply and operation. This attention to detail reduces the risk of delays or unexpected challenges during installation. By identifying potential issues early, our survey ensures the project runs smoothly and efficiently.
Preparing your home for a smooth installation
Once the survey is complete, preparation of the installation area begins. Protecting your home is a top priority. Floors are covered, and the work area is cleared so our team can carry out the installation safely and efficiently.
This preparation helps prevent damage to your property and allows the installation process to proceed without interruptions. A well-prepared environment is essential for both the safety of our technicians and the integrity of your home.
Creating the aperture and managing the power supply
A critical step in the installation is creating the aperture, the space through which the lift will travel between floors. This must be done with precision to maintain structural integrity and allow smooth, safe lift operation.
Equally important is the power supply. Unlike with some competitors, where cables may be exposed or pump boxes are visible, Uplifts homelifts are designed for a clean, discreet finish. We ensure the lift’s power is routed through the upper floor, eliminating unsightly wiring and providing a more aesthetically pleasing solution.
This approach contrasts with other systems, where power cables may be visible or lifts that require trunking or pump boxes along the walls. Uplifts offers a polished, seamless installation with no compromise on safety or functionality.
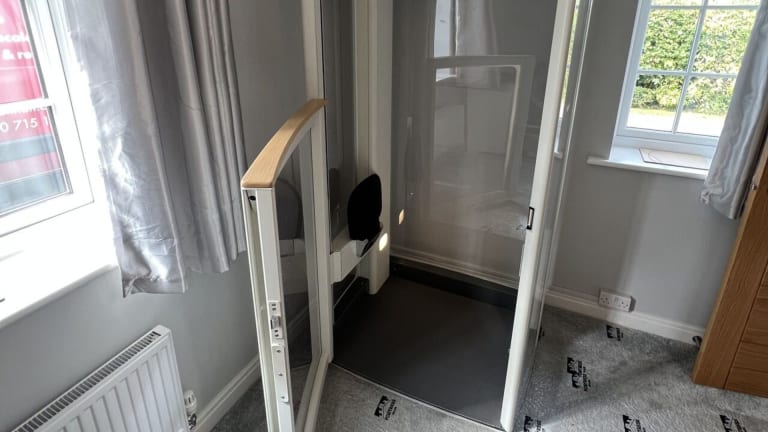
Installing the header and guide rails
The main header, often referred to as the ‘heart’ of the lift, is installed next. This component houses the drive system that powers the lift, ensuring smooth and reliable operation.
After the header is in place, the guide rails are installed. The lower and middle guides support the lift’s base and midsection, while the upper guides are carefully measured, cut, and fitted to the ceiling. One of the advantages of Uplifts homelifts is that the upper guides do not need to be attached to the ceiling joists, offering greater flexibility during installation and avoiding unnecessary structural work.
Once all guides are installed, the header is carefully positioned between them, and the floor of the lift is fitted securely. The lift carriage, the compartment where passengers travel, is then built and positioned within the guides, ready for testing.
Rigorous safety testing
Safety is at the core of every Uplifts homelift installation. Once the lift is assembled, it undergoes comprehensive testing to ensure it is fully operational and safe to use.
This testing includes weight checks to confirm the lift can safely carry its maximum load, operational tests to ensure smooth travel and stopping, and verification of all safety features. This includes safety edges, emergency stop mechanisms, and backup battery systems.
By thoroughly testing each lift, we ensure that it meets the highest safety standards before it is handed over to the homeowner.
User demonstration and support
Once the installation and testing are complete, our team provides a full demonstration of the lift’s operation. This is an important step, as it ensures that users feel confident and comfortable using the lift.
During this demonstration, we explain the lift’s safety features and provide guidance on day-to-day use and maintenance. We also answer any questions about the lift, ensuring homeowners understand how to use it safely and efficiently.
Advantages of choosing Uplifts homelifts
There are many reasons homeowners choose Uplifts homelifts over other options:
Minimal disruption: Our installations are quick and efficient, often completed within a single day, depending on the layout of your home.
No shaft required: Uplifts homelifts eliminate the need for a traditional lift shaft, simplifying installation and saving space.
Sleek, modern design: The lift integrates seamlessly into your home’s interior without unsightly cables or components.
Safety first: Advanced safety features include overload system, safety edges, emergency stop systems, and a backup battery (GSM unit)
Energy efficient: Uplifts homelifts use less energy per journey than boiling a kettle, making them environmentally friendly and cost-effective.
By combining advanced technology, safety, aesthetics, and ongoing support, Uplifts provides a homelift that enhances both the accessibility and value of your home. With 24/7 servicing and dedicated post-installation care to ensure lasting performance and peace of mind.
Ready to take the next step? Contact Uplifts today to discover the perfect homelift solution for your home.